After previously working on a DevOps project where Jenkins and SonarQube were some of the key components, I realized that it is not only essential to be able to install SonarQube on GCP using Kubernetes, but with GKE it is actually really simple to execute. But how? Read on for a step-by-step guide and screenshots that will help you successfully complete the installation.

Installing SonarQube On GCP using Kubernetes
Requirements
- Setup SonarQube on a public IP Address on port 9000 (port can vary) using GCP and a Cloud SQL Database. You can do it in MySQL or in PostgreSQL.
Database
- First, setup the database. In GCP, the suggested approach for setting up a relational database is to use Cloud SQL. The following example uses Cloud SQL for MySQL, but you can also use PostgreSQL too.
- Next, set up MySQL in GCP. Click here for setup instructions. NOTE: You need billing enabled on your project in GCP, so be prepared to do that.
- Once you are at the stage where you can login to the database, create a database named sonar by doing the following:

- Once you are at the MySQL prompt, do the following:

- Then, confirm if database has been created:

Kubernetes
- Once the requirements are established and the database is set up, we need to create a deployment in Kubernetes. For that, we need to setup some secrets so that we can use them later in the deployment configuration. Please read this to get a better understanding of why we provide certain values in the deployment configuration.
- Our deployment file looks like this:
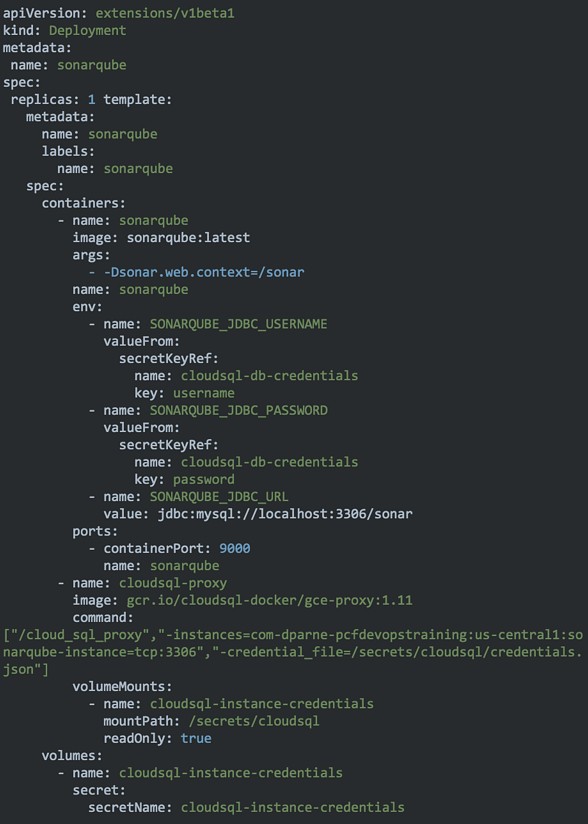
- NOTE: The instance name (com-dparne-pcfdevopstraining) here will be different, and parts until template are pretty standard for creating a deployment with name SonarQube.

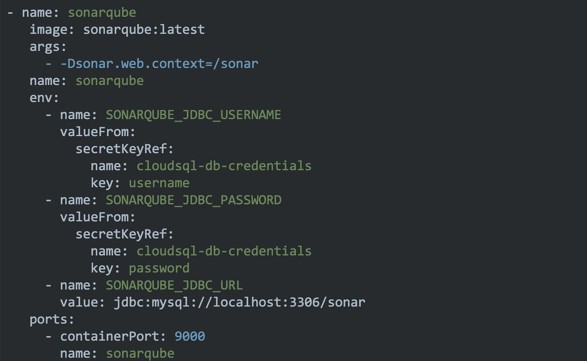
- Now, let's take a look at the containers. We want a container for running sonar. For that we’ll want to use a docker image.
- Using the JDBC username and password provided from the secret we created for Cloud SQL credentials, run sonar in a container in the pod at 9000 port. If you haven't already set up a JDBC username and password, you can do so by following instructions provided here.
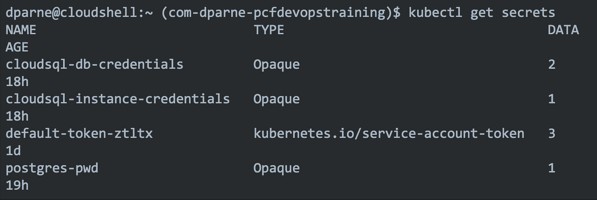
- To confirm if the secret has been created, run this command in Google's Cloud Shell:

- Your output will look somewhat similar to this:
- The remainder of the deployment configuration is also related to the connection to cloud SQL. For instructions on how to set up a connection from an application running in Google Kubernetes Engine to a Cloud SQL instance, click here.
- Create a file in your cloud shell by running vi sonarqube-deployment.yaml and adding the content above.
- Now you are ready to create the deployment and can run the following in your cloud shell:

- It may take a few minutes but that should successfully create a pod with 2 containers running. Run the command to get pods and the following output:


- Next, go back and check the database in mysql. Login to the database by running the following:

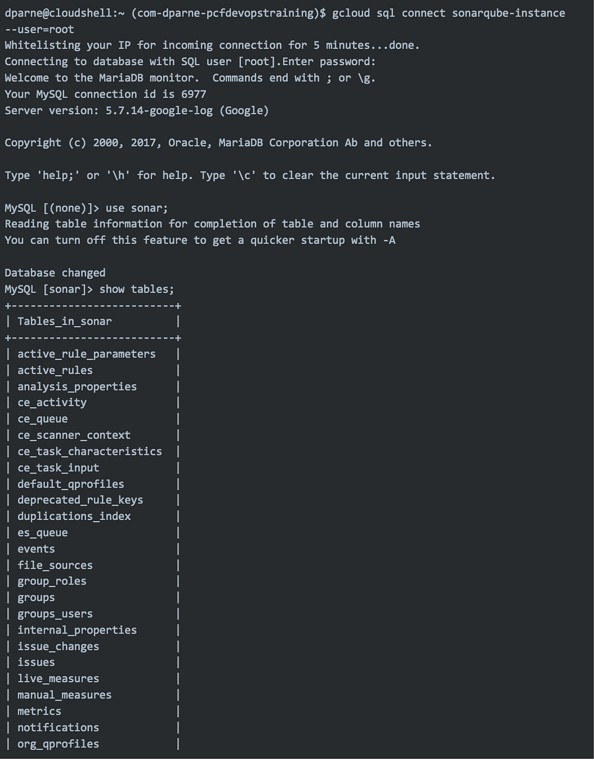
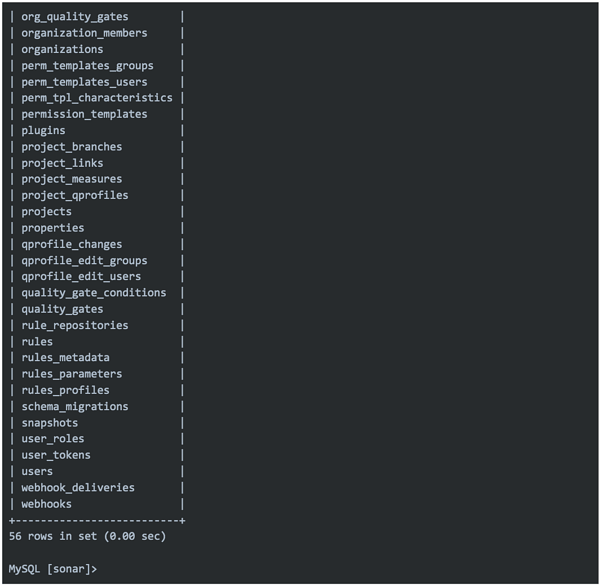
- As you can see, SonarQube created several tables in your database, which means that you have sonar running. However, you’ll want sonar to be accessible via a public IP. For that, all you have to do is expose the deployment in Kubernetes via a load balancer. To do so, run the following command:

- After a few minutes you will have an external IP assigned to your deployment. You can confirm by running kubectl get svc and you will see something like the below. Under external IP it could be <pending> if it is not finished setting up the IP, but eventually you should have this:

- That’s it, you are done! You have successfully Installed SonarQube on GCP using Kubernetes. Go to the <IP_ADRESS:9000/sonar> to confirm.
Apple
Apple, known for their secrecy, built LIAM to disassemble the end-of-life iPhones. As well, there are rumors of Apple building an autonomous car in the market place. But there is evidence that they are working on something as they have purchased PrimeSense, a 3D scanning technology and have enhanced their Siri platform to be contextually aware with predictive analytics.