Getting started with spring cloud dataflow and confluent cloud Getting started with Spring Cloud Dataflow and Confluent Cloud
Skip to main content

Select your location

Getting started with Spring Cloud Dataflow and Confluent Cloud

Getting started with Spring Cloud Dataflow and Confluent Cloud

Let’s set the stage here: Data is the currency of competitive advantage in today’s digital age. As a consultant with extensive experience in the modernization and transformation space, I have seen many analysts struggle with their data due to the sheer variety of data types and number of different ways it can be shaped, packaged and evaluated.  

Within any particular organization different teams can use different tools, different rule sets, and even different sources of truth to handle any particular data steward task. These operational differences lead to differing definitions of data and a siloed understanding of the ecosystem. 

From the ashes of these battles have arisen several tools, some better than others. Most recently I’ve been working with Apache Kafka and Spring Cloud DataFlow to help transform my clients’ data ownership responsibilities, and at the same time, prepare them for the transition from batch to realtime.  

What follows is a step by step explanation of not only the process to use the tools, but why they were picked and what lessons were learned along the way.  Follow along as we walk through the installation, configuration of Confluent Cloud and Spring Cloud DataFlow for development, implementation, and deployment of Cloud-Native data processing applications.

Prerequisites:

  1. An understanding of Java programming and Spring Boot application development.
  2. A knowledge of Docker and Docker Compose.
  3. An understanding of Publish / Subscribe messaging applications like Apache Kafka or RabbitMQ.
  4. Java 8 or 11 installed.
  5. An IDE or your favorite text editor (I see you out there vim / emacs lovers).
  6. Docker installed.

NOTE: All the following instructions, screenshots, and command examples are based on a Mac Pro running Catalina with 16GB of RAM. I wouldn’t recommend attempting to deploy Spring Cloud DataFlow locally with any less than 16 GB of RAM, as the setup does take a significant amount of resources.

First steps

To get us started, I'm going to show you how to download and deploy a docker-based installation of Spring Cloud Data Flow and show you how easy it is to launch a Stream that uses Kafka as its messaging broker. Start by navigating to the Spring Cloud DataFlow Microsite, and follow the instructions to download the docker compose file.  You’ll want to put this file in a location you can remember.

Spring Cloud DataFlow Microsite_1

I use a workspace folder on my computer so I’ll navigate to that directory and make a new folder called `dataflow-docker` to store and use. I’ll then navigate to that directory and download the `docker-compose.yml` file. 

Dockercompose

The docker setup in this file allows for dynamic decisions as to what versions of the Data Flow Server and the Skipper Server that are part of the deployment.  The dataflow site instructs you on what versions to use and how to set the variables. As of this writing that is 2.1.2 for the DataFlow server and 2.1.1. for the Skipper Server.

Starting the DataFlow service

Now that we know what environment variables to set, we can launch the service and get familiar with it.  Let’s start the service up with the detach flag ` -d` and review the components that get created.

Starting the dataflow service
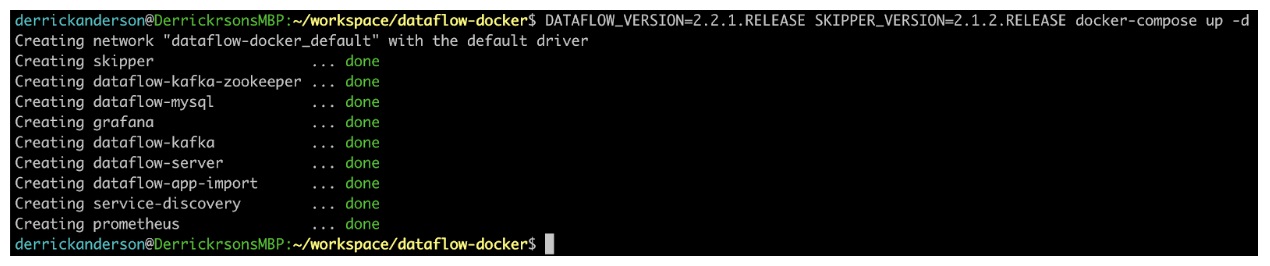
As you can see, there are several services that get created.  The key parts are DataFlow-server and Skipper, which comprise the actual DataFlow experience and app deployment. Grafana and Prometheus, which are used for metric gathering and visualization, as well as Kafka and Zookeeper which is our messaging platform and the coordination server.  I encourage you to review the documentation for DataFlows’ architecture located here to get a deeper understanding of how it all works together.

Now we can launch the DataFlow U. We can see that DataFlow has started successfully and that there have been many applications automatically imported for us. These applications were downloaded during DataFlow startup and are all setup to use Kafka.

Data flow

Deploying a Kafka-Based stream

Now let’s test out creation of a Stream using the built-in applications.  The applications that come pre-installed with DataFlow are setup to utilize the Spring Cloud Stream Kafka Binder and work out of the box with the setup of DataFlow.  

We will test our setup using an example stream called “Tick Tock”.  This will use the pre-registered Time and Log modules and will result in a message of the current time being sent to the Standard Out of the Log module every second. 

To build this stream we will navigate to the “Streams” definition page and click “Create Stream(s).”

Create streams

Here you can use either the Stream DSL window or the Drag and Drop Stream Composer below to design your stream definition.  We’ll use the Composition UI. In this screen, you can also see a list of all registered applications grouped by type. From this section we will select “time” and “log”, dragging both onto the composition pane on the right.  Your composition pane should look like the one below:

Create a stream

You may have noticed that as you modified the contents of the stream composition pane the Stream DSL for the current definition has updated.  This works both ways, if you input Stream DSL, you get a UI representation. The ability to reproduce stream definitions will come in handy in the future as you can develop it with the UI and copy the Stream DSL for later use.

At this point, we have two applications that we know are going to be part of our stream and our next step is to connect them via a messaging middleware.  One of the key pieces of this solution is that the connection of applications, management of consumer group and creation/destruction of topics and queues is managed by the Data Flow application.  Constructing your applications in this way allows you to think about your flow of messages in a logical sense and not worry so much about how many topics you need, partitions, or anything else. 

Source applications that generate data have an output port:

Outport

Sink applications that consume data have an input port: 

Processor application have both an input and an output port.

You connect application in DataFlow by dragging a line between their ports or by adding the pipe character  | to the Stream DSL definition.

Let’s finish creating this stream and give it a name “ticktock."


This creates the stream definition and registers it with DataFlow.  Returning to the stream list page, we can see our stream definition.

Now we can deploy our stream to our local environment using the application. Click the play button labeled “deploy” to show the deployment properties page.

Deploy and definition ticktock 

This page allows you to select your deployment platform, generic selections like ram and CPU limits, as well as application properties.  We are going to use the default deployer (local) and because we’re deploying locally, we need to set the port. Let’s do that now and deploy the stream.

Application properties


You may need to refresh the page several times while the stream deploys. Once it’s deployed you will see the status change from deploying to deployed.


Ticktock properties

If you click on the name of the stream you can see detailed information, such as its deployment properties, definition, and even see the application logs from the runtime. This page also gives you a detailed history of the flags generated at runtime for the topics/queues, consumer groups, any standard connection details (like how to connect to Kafka) and gives you a history of changes for that particular stream.

The drop down for the logs allows you to view logs from any app in the stream. If we select the log application we can see that the messages were received from Kafka for the time application.


Now you’ve got a basic understanding of stream deployment and management. Now we can discuss how to prepare for a Cloud Native deployment of DataFlow.


Confluent Cloud

When evaluating deployments of Data Flow to a cloud native platform, one item that was evaluated was the messaging platform to use and how to manage its deployment.  After evaluating heavy and complex systems like Google Pub/Sub and Amazon Kinesis, we ultimately decided on Confluent Cloud’s managed Kafka platform. This was due to total cost of operation comparisons and ease of use. Confluent Cloud provided a consistent value for the price while also providing crucial business items such as the Schema Registry feature.  

Getting started with Confluent Cloud is straight forward. You can start a cluster for experimentation in just a few minutes, and Confluent will give you a bill credit for your first 3 months to begin your experimentation.  

Let’s navigate to confluent.cloud and sign up.  The homepage for Confluent starts with the “Create a Cluster” page.


Create a cluster

Let’s go ahead and start creating our managed Kafka cluster by clicking on “Create Cluster."

Create a cluster

We had determined that our final deployment platform for Data Flow will be the Google Cloud Platform and therefore we want to deploy our Kafka cluster to CGP as well to ensure the lowest latency and highest resilience.  After you click “Continue,” Confluent will provision a cluster in seconds.  

The next page is the management homepage for your Kafka cluster.  Let’s get our connection information for our cluster. On the left hand menu, select the “Cluster Settings” menu and select “API Access." On this page you’ll create an API key to use for your authentication.

Create an api

After clicking “Create Key” you will be given the Key and Secret to use, copy those down now as you won’t be able to open the key again.


NOTE: These credentials are not valid, please do not attempt to use them.

Once you have created your key we can evaluate our connection details.  Navigating back to the Cluster homepage you will find a menu entry for “CLI and Client Configuration” that hosts a multitude of sample entries for connection to the cluster you have configured. Let’s select Java as our applications are written in Spring Boot.

Client confiiguration

Utilizing these connection settings are less straightforward than when using Data Flow. These settings are propagated to Spring through the Binder configurations. You can dive deeper into the connection settings on the Spring Cloud Stream Binder Kafka documentation here. Note that we are not using Kerberos for our authentication so our properties go into `spring.cloud.kafka.binder.configuration.<properties>` as opposed to the `jaas.options` section.


This will result in the following properties if we drop in the API key and Secret from above. 

```
// Cluster Broker Address
spring.cloud.stream.kafka.binder.brokers: pkc-43n10.us-central1.gcp.confluent.cloud:9092
//This property is not given in the java connection. Confluent requires a RF of 3 and spring by default only requests a RF of 1.
spring.cloud.stream.kafka.binder.replication-factor:3
//The SSL and SASL Configuration
spring.cloud.stream.kafka.binder.configuration.ssl.endpoint.identification.algorithm: https
spring.cloud.stream.kafka.binder.configuration.sasl.mechanism: PLAIN
spring.cloud.stream.kafka.binder.configuration.request.timeout.ms: 20000
spring.cloud.stream.kafka.binder.configuration.retry.backoff.ms: 500
// The SASL Jaas options (as opposed to Kerberos JAAS) note this should ALL be on one line
spring.cloud.stream.kafka.binder.configuration.sasl.jaas.config: org.apache.kafka.common.security.plain.PlainLoginModule required username="KWUIHDJ4CWYTUUZ2" password="woa0osn+AkzkfgCDDJ3mg5VPW0YVvdSsMGz20iDK0rNYuulxbgkAP8WWp02KOrYy";
spring.cloud.stream.kafka.binder.configuration.security.protocol: SASL_SSL
```

You can see the details include a property that isn’t included in the connection details. The `replication-factor` is a setting that controls the amount of redundancy for messages that the broker maintains. When testing these connections we received a ‘failure to connect’ that indicated a policy violation at the broker level. To resolve this we validated the replication factor at the broker level and matched it. These settings weren’t the easiest to find. With DataFlow there isn’t a need to ever create or manage a topic directly with the broker as all that lifecycle is managed for you. If you go to “Topics > Create Topic” you can see on the right, the broker settings for the topic.

New topic 


In order to test this configuration and your cluster’s connection you can write a quick stream application in order to publish. Writing a test application and connecting it is not covered in this blog post. So we will jump directly to adding these settings to our deployment.

Connecting Data Flow to an External Broker

Before we walk through enabling Confluent Cloud to DataFlow we should discuss the way that settings are applied.  Spring Cloud Data Flow uses two services to manage and deploy applications. The Data Flow server is responsible for Global properties that are applied to all streams regardless of the platform they are deployed to. This is typically where you would apply things like your monitoring system parameters.  The Data Flow server is also responsible for maintaining application versioning and stream definitions. The Skipper server is responsible for application deployments. The properties in the Skipper server are collated into platform-specific properties, such as properties specific to local deployment, Kafka deployments, Cloud Foundry, or Kubernetes. You can explore the DataFlow microsite for further details on exactly how the Architecture is outlined.

For our situation we are working on a Kafka-only environment and that will be separated by environment through different deployments.  So we will add our connection details from above to the Data Flow server directly. This is done by editing the `environment` properties for the server in the docker-compose file.  

Look for the section for the service `dataflow-server` and under that, the `environment` properties.  You can see several defaults that are set already for the default connections with kafka and zookeeper.  We will need to replace these with our connections to Confluent Cloud. 

Let’s begin by removing the following lines. 

spring.cloud.dataflow.applicationProperties.stream.spring.cloud.stream.kafka.binder.brokers=PLAINTEXT://kafka:9092
spring.cloud.dataflow.applicationProperties.stream.spring.cloud.stream.kafka.streams.binder.brokers=PLAINTEXT://kafka:9092
spring.cloud.dataflow.applicationProperties.stream.spring.cloud.stream.kafka.binder.zkNodes=zookeeper:2181
spring.cloud.dataflow.applicationProperties.stream.spring.cloud.stream.kafka.streams.binder.zkNodes=zookeeper:2181
Notice that all these properties are standard spring properties prepended with `spring.cloud.dataflow.applicationProperties`.  That’s because Data Flow itself IS a Spring Boot app!! All we need to do is add in our properties from above with the same prefix. There are however a few intricacies.  The way the deployer converts and maps these properties is in a tree structure. The `spring.cloud.dataflow.applicationProperties` is the base node for all default application properties that are mapped with dataflow.  But there is an indicator following it that indicates whether those properties apply to stream, batch, or task applications. For stream processing apps, those will look like this:

```
// Cluster Broker Address
spring.cloud.dataflow.applicationProperties.stream.spring.cloud.stream.kafka.binder.brokers: pkc-43n10.us-central1.gcp.confluent.cloud:9092
//This property is not given in the java connection. Confluent requires a RF of 3 and spring by default only requests a RF of 1.
spring.cloud.dataflow.applicationProperties.stream.spring.cloud.stream.kafka.binder.replication-factor:3
//The SSL and SASL Configuration
spring.cloud.dataflow.applicationProperties.stream.spring.cloud.stream.kafka.binder.configuration.ssl.endpoint.identification.algorithm: https
spring.cloud.dataflow.applicationProperties.stream.spring.cloud.stream.kafka.binder.configuration.sasl.mechanism: PLAIN
spring.cloud.dataflow.applicationProperties.stream.spring.cloud.stream.kafka.binder.configuration.request.timeout.ms: 20000 spring.cloud.dataflow.applicationProperties.stream.spring.cloud.stream.kafka.binder.configuration.retry.backoff.ms: 500
// The SASL Jaas options (as opposed to Kerberos JAAS) note this should ALL be on one line
spring.cloud.dataflow.applicationProperties.stream.spring.cloud.stream.kafka.binder.configuration.sasl.jaas.config: org.apache.kafka.common.security.plain.PlainLoginModule required username="R6JGMNN7AMGVPBG7" password="Q4W0t/u8NIFqnaaXYNqkvp8fYwQ3kQlZPdctQbxQGx6u7nHLZvHTpo0VPZWzEOA1";
spring.cloud.dataflow.applicationProperties.stream.spring.cloud.stream.kafka.binder.configuration.security.protocol: SASL_SSL
```

After editing your docker compose file it should look like below:


You’ll notice that this setup still stands up Kafka and Zookeeper.  You can remove that by commenting out the Zookeeper and Kakfa services and removing the `depends_on: -kafka` lines from the dataflow-server service.

Now you can start your docker compose again using the same commands as earlier, you will see that no Zookeeper or Kafka services are started this time.

Docker compose 

Navigating back to the application dashboard you can repeat the steps to deploy the tick tock application stream.  Once deployed, navigate to the deployment details and you can see the application properties applied now reflect your remote Confluent Cluster configuration settings.

Stream docker deployed 

You can review the application logs just as before and see the remote connection created and the messages begin flowing. 

Congratulations! You’ve just provisioned a Kafka cluster in the cloud, deployed Spring Cloud DataFlow in a local environment and written a test application to validate your connection details. 

Next up is to deploy Spring Cloud DataFlow in the cloud and begin using it day to day.  But that is a story for another post. Keep an eye out for continued blogs on this topic and let us know if this helps you.

Want to know more?

Get in touch