
Introduction to Azure Spring Cloud
Introduction
Azure Spring Cloud is a managed environment built by Microsoft and Pivotal with pre-configured, opinionated, ready-to-deploy infrastructure services and runtime for Spring-based applications.
For the Spring Boot developers who have worked with Pivotal Cloud Foundry, the availability of a managed environment that provides infrastructure services such as a Spring Cloud Service Discovery, Spring Cloud Config Server, auto configuration of properties, and more, has been a major advantage. It helps them to avoid the need to create, deploy and manage applications or services that can provide this functionality. The Pivotal and Microsoft partnership brings these features to Azure.
As of this writing, Azure Spring Cloud is in Public Preview and could undergo changes before releasing a General Availability version.
Sample Applications
Let’s dive straight into a set of sample applications that can demonstrate the features of Azure Spring Cloud and instructions on configuring and using them.
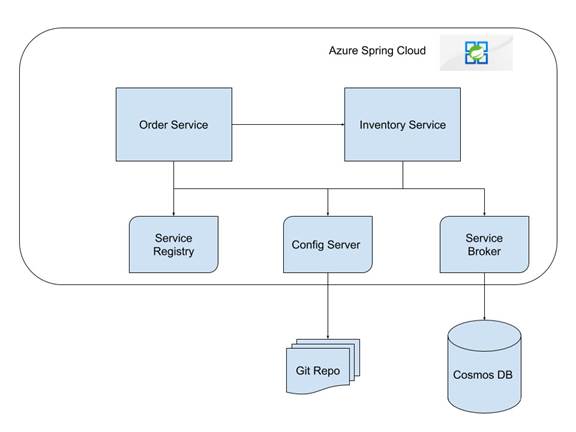
For this example, we’ll create two microservices -- an Order Service and Inventory Service.
The Order Service will receive an order, and it will invoke the Inventory Service to update the inventory. The Order Service will make use of the Service Registry (Eureka) feature of Azure Spring Cloud to look up references to the inventory service.
The Inventory Service will receive a request to update the inventory. It will look for a feature flag value in a configuration file and, based on the value, the inventory data in the Cosmos DB will be updated. The Inventory Service will make use of Service Registry (Eureka), Config Server (Git) and Cosmos DB binding of Azure Spring Cloud.
In addition to the specific features of Azure Spring Cloud, we will cover some of the common errors and issues, along with their solutions.
Inventory Service
We will start with a simple REST web service and will then add Spring Cloud features. Create a starter project using http://start.spring.io, open the generated project in an IDE, and select the following features:
- Spring Web
- Azure Support
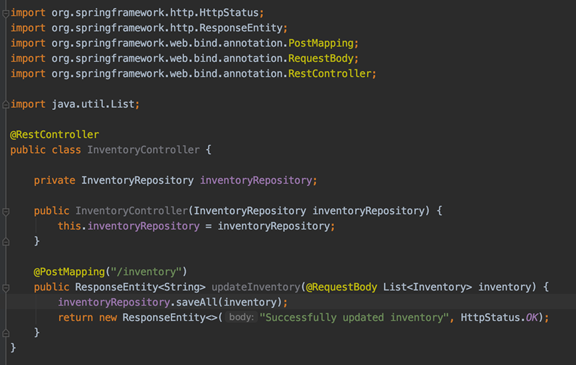
Create a REST Controller class with a Post method that accepts a List of Inventory objects and returns a response. In this example, we used Lombok to simplify the bean classes. Add the Lombok dependency in the pom.xml/build.gradle file and check “Enable Annotation Processing” (if using IntelliJ):
build.gradle
```
<dependency>
<groupId>org.projectlombok</groupId>
<artifactId>lombok</artifactId>
<version>1.18.10</version>
<scope>provided</scope>
</dependency>
```
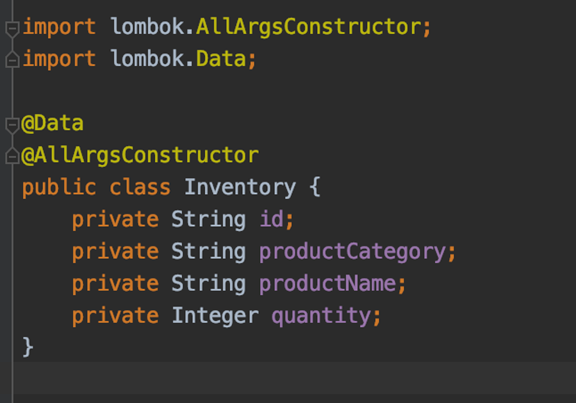
Inventory.java
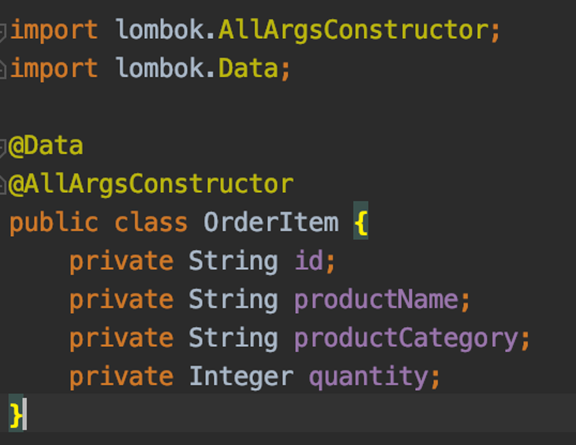
The @Data annotation adds a getter and setter for all fields and overrides the toString, equals and hashCode methods. The @AllArgsConstructor adds an “all arguments constructor”.
At this point, we have a simple REST App. Now, let’s add the necessary code to interact with an Azure Cosmos Database.
Cosmos DB Integration
Add ‘azure-cosmosdb-spring-boot-starter’ to the dependency list in your build file
Build.gradle
```
<dependency>
<groupId>com.microsoft.azure</groupId>
<artifactId>azure-cosmosdb-spring-boot-starter</artifactId>
</dependency>
```
Since we selected Azure Support in the list of dependencies during the app creation, a property named `azure.version` will be present in the `<properties>` tag. So, we do not need to explicitly mention a version number for any dependency from `com.microsoft.azure` group.
Next, create a repository interface that extends DocumentDbRepository from the Azure Cosmos library:
InventoryRepository.java

Our `id` field is a String type and hence, in the above snippet, you can see the usage of String for ID.
Inject the Repository to the Controller and modify the Controller method to invoke the `saveAll` method. Create another method to provide a GET interface. This method will return all entries from the database.
Even though we haven’t coded any validations or exception scenarios, at this point, we have an app ready to be deployed to Azure.
An important point to note here is that, as a developer, you haven’t written any code or added any configurations to connect to a Cosmos DB. This is where the advantage of using Azure Spring Cloud comes into the picture. Let’s see how to deploy this app and test it in Azure.
Azure Setup
Before we proceed further, we need to set up the Azure. we will be using Azure CLI throughout this example since Azure Spring Cloud applications cannot be deployed through Portal at the time of this writing e. If you do not have Azure CLI, it can be installed from here.
We will assume that you have an existing subscription with no other resources. First, login to Azure and create a resource group:
```
az group create -n <name> -l <location>
```
Create a Cosmos DB:
```
az cosmos create -n <name> -g <resource_group_name> --locations regionName=<location>
```
Cosmos DB creation may take some time.
Next, create the Azure Spring Cloud. This is not available in all locations. One of the available locations is `eastus`.
```
az spring-cloud create -n <spring_cloud_name> -g <resource_group_name> -l eastus
```
Creation of the Azure Spring Cloud through the Portal provides some extra defaults that are not available while creating through CLI, such as the ability to create and associate Log Analytics workspace and Application Insight. In addition to this, a Diagnostics Settings to send the Application Logs to this workspace is also created by default. This is a nice addition in the current version.
The spring-cloud CLI extension v0.2.0 provides an option to tail the application logs. The details are available here. While we were working with v0.1.0, lack of this feature necessitated the creation of a Log Analytics workspace. With the option to tail logs, there is no need to create a Log Analytics workspace, unless you want to query older logs or retain them for future use.
If you do need to manually create the Log Analytics workspace, then follow the below instructions. Otherwise, proceed to Create Application section.
Refer here for Log Analytics workspace setup.
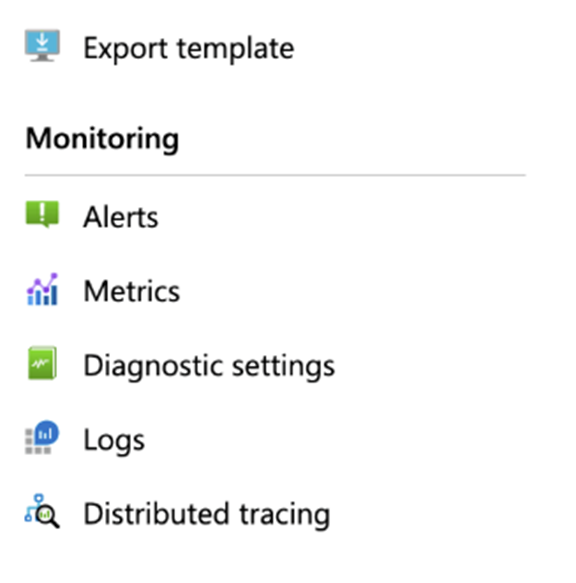
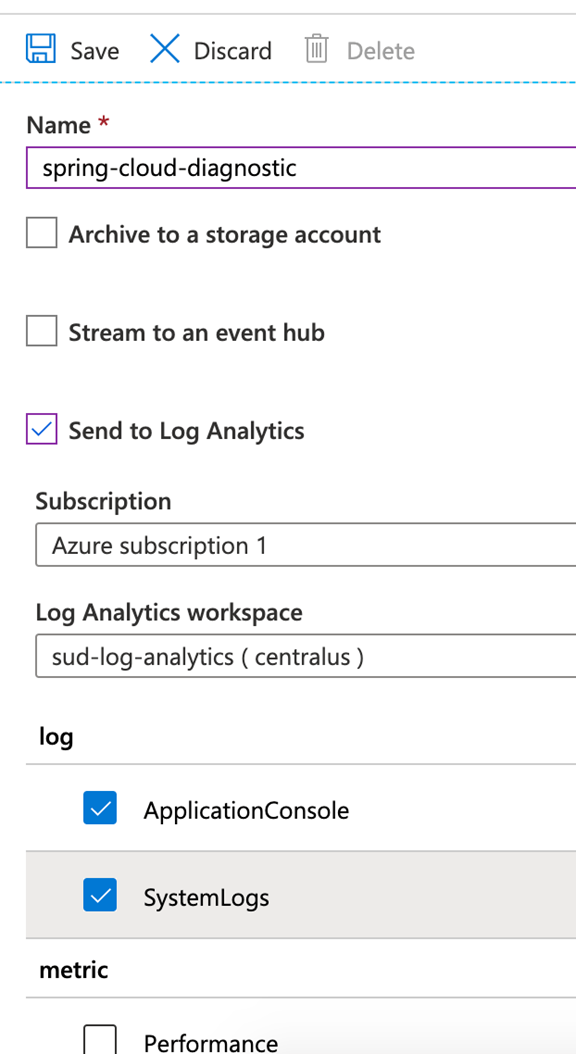
Once the Log Analytics workspace is created, go to the Diagnostic Settings on the left pane of Azure Spring Cloud.
Click `Add diagnostic setting` and select `Send to Log Analytics` checkbox. Also select the `SystemLogs` and `ApplicationConsole` under `log`.
Create Application
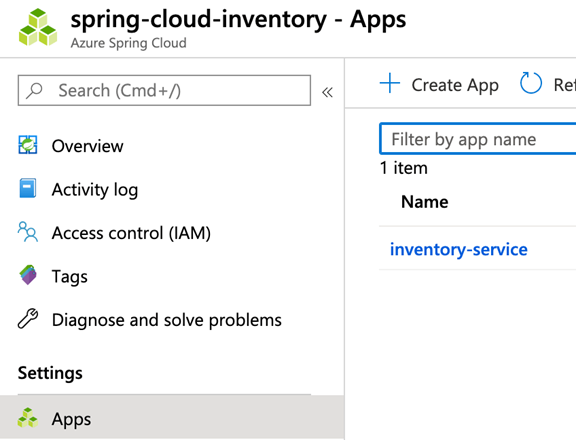
Before we can deploy our Inventory application, we need to create the application manually. It can be done in the Portal under the Apps section in the left pane or using the CLI.
```
az spring-cloud app create -n <name_of_app> -s <name_of_azure_spring_cloud> -g <resource_group_name>
```
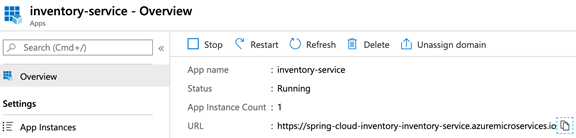
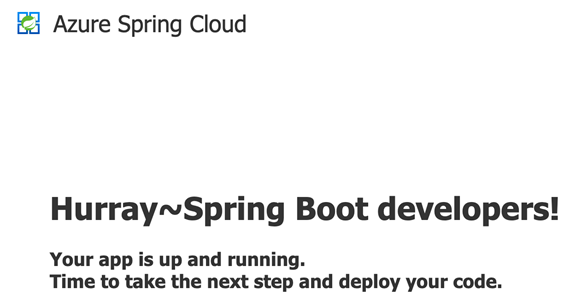
Once the app is created, assign a public domain.
```
az spring-cloud app update -n <name_of_app> -s <name_of_azure_spring_cloud> -g <resource_group_name> --is-public true
```
The public domain can be copied from the Portal. Accessing it will provide a welcome page as below
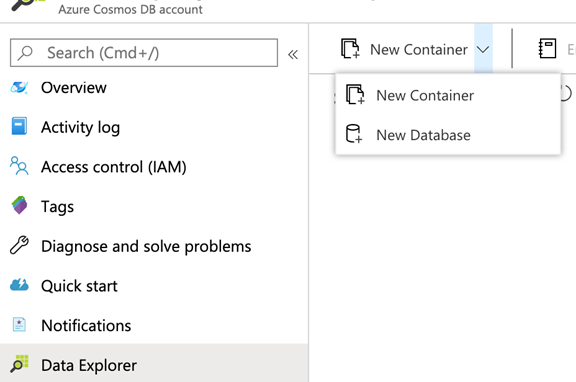
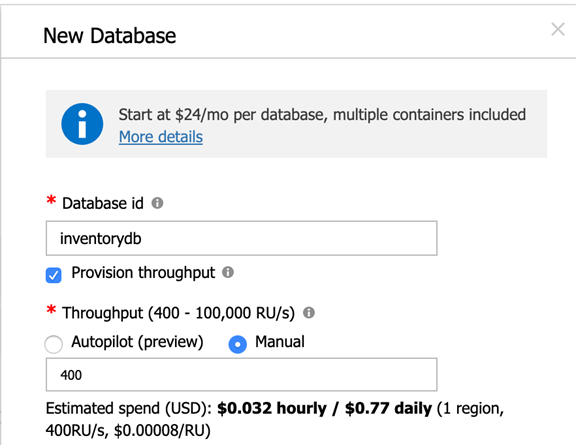
Once Cosmos DB is created, navigate to the DB Blade and go to the `Data Explorer` section. You’ll see that there is no database. Extend the arrow near `New Container` and select `New Database`.
Provide a Database Id and create.
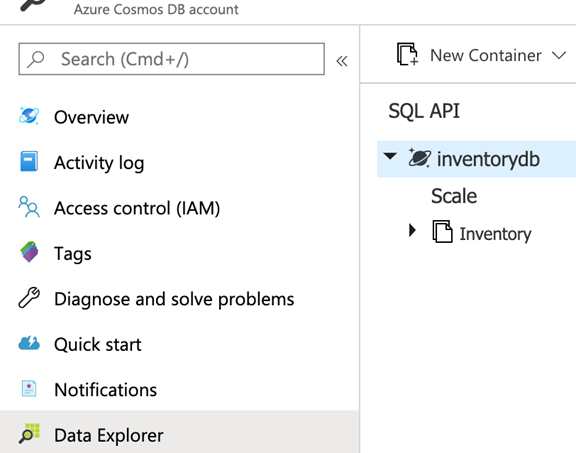
Once the database is created, you can expand the DB and make sure that there are no containers under that
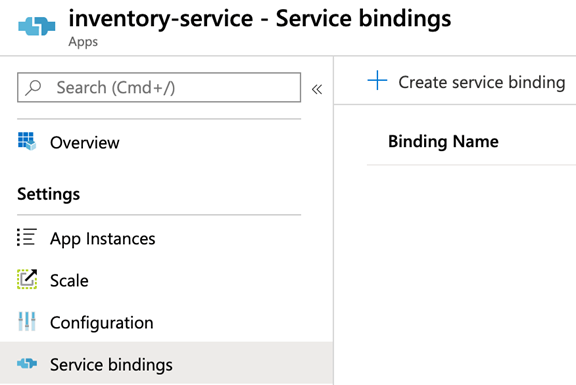
Now, we need to connect this database to our `inventory-service` app. This is done through Service Binding. Navigate to the Spring Cloud App resource and access the Apps from the Left Navigation and click on the inventory-service app.
Access the `Service bindings` option from the Left Navigation and click `Create service binding`.
Provide the requested fields and create a binding. For the Key, the Primary Master Key can be selected.
Once the binding is created, restart the app. Even though the Portal will show immediately that the app is restarted, wait for the App Instance to reflect that. Azure uses blue-green deployments. This is achieved by creating a new instance of the app with the Service binding. Until the new instance is up and running, the traffic will continue to flow to the old instance. This can be verified by accessing the `App Instances` tab on the Left Navigation. You’ll see two instances.

The existing instance is shown as “Retiring” and the new instance is in “Pending”. Wait for only one instance to be available in “Running” status. You’ll see the Discovery Status as DOWN. We’ll come to that later.
At this point, we are ready to start the deployment of our code.
Application Deployment
For the purpose of this sample, we will not cover the unit testing, as it requires several configurations to ensure a successful execution of JUnit test cases in the local workspace. So, in order to make it easier, delete the InventoryApplicationTests that got created while generating the project.
Compile and Build a jar.
Navigate to the root of the project in the CLI and execute the command below to deploy the generated jar to Azure Spring Cloud:
```
az spring-cloud app deploy -n <name_of_app> -s <name_of_azure_spring_cloud> -g <resource_group_name> --jar-path <path_to_generated_jar>
```
The generated jar will be present under the `target` folder. For ex: `/target/inventory-0.0.1-SNAPSHOT.jar`
Once the command finishes the execution, go to the App Instances section in the Portal and wait for only 1 instance to be in the `Running` status.
We have completed the deployment of our app, and our app has successfully connected to the Cosmos Database that we created. In order to validate this, you can go to the Data Explorer section of Cosmos DB and you’ll see a new container named `inventory` under the database. The container name defaults to the name of the Inventory class. We can override this with an annotation, if needed.
As you can see, without any code or configuration, our app was able to connect to the DB and create a collection. This works because Azure Spring Cloud injected the three variables needed for our app to connect to Cosmos (azure.cosmosdb.uri, azure.cosmosdb.database, azure.cosmosdb.key)! You can see these variables if you click on the Service binding entry under the App.
Now, let’s test our application. Using the browser, access the GET interface. You’ll see an empty list. Using cURL or Postman, invoke the POST endpoint with valid data. We used postman with sample data as below.
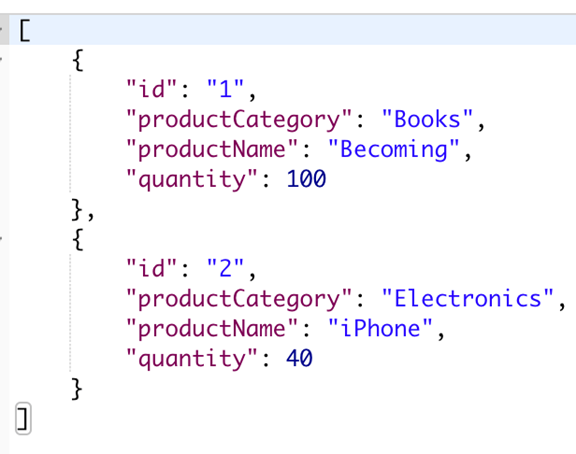
Now, access the GET endpoint again and you’ll see the response below:

Service Registry Integration
Application Deployment
As indicated in one of the steps above, our app instance shows the Discover Status as DOWN. This is because we have not yet configured any Service Registry. Let’s go ahead and do that now.
Add the below code to the pom.xml:
<dependency>
<groupId>org.springframework.cloud</groupId>
<artifactId>spring-cloud-starter-netflix-eureka-client</artifactId>
</dependency>
<dependency>
<groupId>com.microsoft.azure</groupId>
<artifactId>spring-cloud-starter-azure-spring-cloud-client</artifactId>
<version>2.2.0</version>
</dependency>
Since we are adding the Spring Cloud dependencies, add this snippet to the `dependencyManagement` and to `properties` section of pom.xml file:
<dependency>
<groupId>org.springframework.cloud</groupId>
<artifactId>spring-cloud-dependencies</artifactId>
<version>${spring-cloud.version}</version>
<type>pom</type>
<scope>import</scope>
</dependency>
<spring-cloud.version>Greenwich.SR3</spring-cloud.version>
The `spring-cloud-starter-azure-spring-cloud-client` dependency provides autoconfiguration of Spring Cloud services.
Add `@EnableDiscoveryClient` to the `InventoryApplication` class. This will register our application in the Eureka Service Registry provided by Azure Spring Cloud.
Now, run `clean`, `package` and `deploy` our application. Use the same deploy command as before. Once the deployment is completed, you’ll see that the Discover Status has changed to UP. Now, any other apps deployed in Azure Spring Cloud can discover this app using its name.
Config Server Integration
In order to demonstrate the integration with a Config Server, we’ll create a simple repository with one property -- a feature flag which determines whether to enable saving of inventory data in database.
Config Server Setup
Create a new Git repo or use an existing repo. Create a file named ‘inventory-service.yml’ and add the below property:
```
feature-flag:
saveInventory: false
```
Assuming that this file is present in the ‘master’ of the Git repo, let’s add this information to Azure.
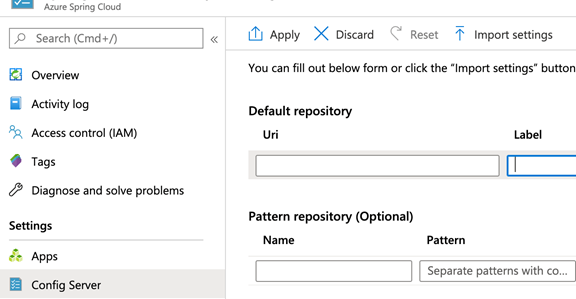
Azure Setup
Go to the Azure Spring Cloud resource and access the `Config Server` option from the Left Navigation.
Add the Git repo URL under `Uri` and the branch name under `Label` and click `Apply.` Wait for the changes to be completed.
Application Deployment
Now, let’s make changes to the application. Add the following dependency:
<dependency>
<groupId>org.springframework.cloud</groupId>
<artifactId>spring-cloud-config-client</artifactId>
</dependency>
In order to take advantage of the auto configuration, let’s add a class named FeatureFlag.
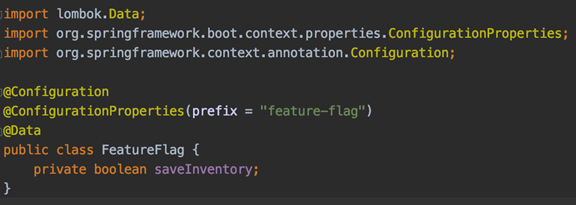
`@Configuration` marks the class as a Spring Configuration class. `@ConfigurationProperties(prefix = "feature-flag")` will help with auto configuration. Azure Spring Cloud Config Server will inject any property with `feature-flag` prefix to the variables in this class. Please note that the prefix must follow kebab case. `@Data` provides the getter and setter methods.
The name of the fields should match with the variable names in the config file (inventory-service.yml).
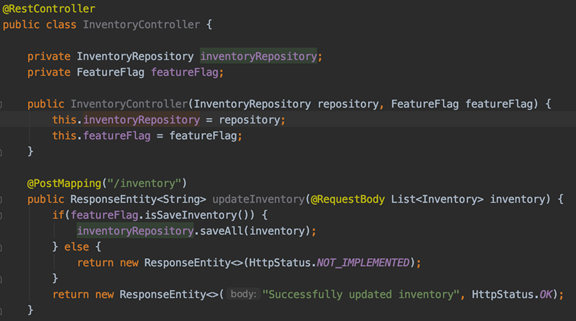
Now, let’s modify the Controller to inject the class and use it in the POST method to decide whether to save the data in the database.
Now, `clean`, `package` and `deploy` our application. Use the same deploy command as before.
Once the deployment is completed, invoke the POST endpoint again and you’ll get a “HTTP 501 - Not Implemented”, error since the feature flag is false. This confirms that Azure Spring Cloud read the configuration from the Git URL we gave and injected into the Application and the Configuration class.
Just to test the change in configuration, modify the file in Git to change the “saveInventory” flag to `true`.
Restart the application and invoke the POST endpoint again. This time, the app will return a success response.
Order Service
For this article, the Order Service will be just a pass-through application. We’ll use it to demonstrate the usage of Service Registry provided by Azure Spring Cloud.
Application Code
Create a starter project using http://start.spring.io select the following features and open the generated project in an IDE:
- Spring Web
- Azure Support
Create a REST Controller class with a Post method that accepts a List of OrderItem objects and returns a response. Similar to Inventory Service, add a dependency for `lombok`.
OrderItem.java
Create the Inventory.java similar to the class in the Inventory service. Add a Controller with a POST method that accepts an Order with a list of Order Items and returns a status. Now, let’s create a client to invoke Inventory Service. We’ll use `feign` as the declarative client for this. Add the below dependencies to the pom.xml:
<dependency>
<groupId>org.springframework.cloud</groupId>
<artifactId>spring-cloud-starter-openfeign</artifactId>
</dependency>
<dependency>
<groupId>org.springframework.cloud</groupId>
<artifactId>spring-cloud-starter-netflix-eureka-client</artifactId>
</dependency>
<dependency>
<groupId>com.microsoft.azure</groupId>
<artifactId>spring-cloud-starter-azure-spring-cloud-client</artifactId>
<version>2.2.0</version>
</dependency>
Feign uses the Service Registry to discover the Inventory service. Hence we need to add the `spring-cloud-starter-netflix-eureka-client` dependency. The `spring-cloud-starter-azure-spring-cloud-client` dependency ensures that the auto configurations happen during startup.
Add Spring Cloud version under `properties`:
<spring-cloud.version>Greenwich.SR3</spring-cloud.version>
Add Spring Cloud under `dependencyManagement`:
<dependency>
<groupId>org.springframework.cloud</groupId>
<artifactId>spring-cloud-dependencies</artifactId>
<version>${spring-cloud.version}</version>
<type>pom</type>
<scope>import</scope>
</dependency>
InventoryServiceClient.java
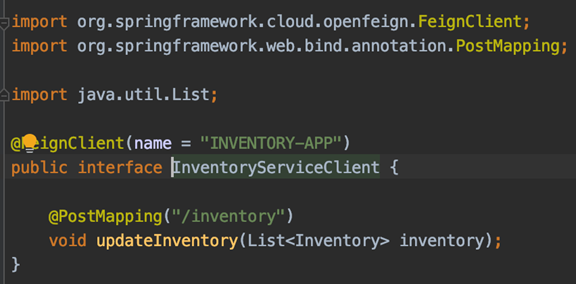
The class itself is simple. The only factor to note is the name parameter for the `@FeignClient` annotation. This should match the name of the Inventory application as shown in Azure Portal.
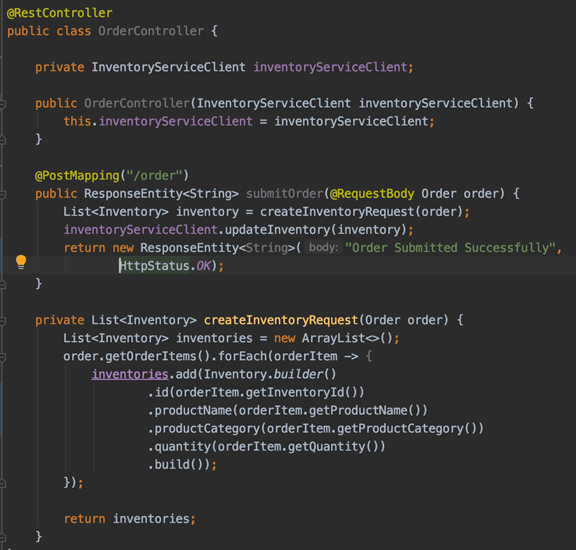
Use this client in the Controller, map the Order object to Inventory object and invoke the Inventory Service.
OrderController.java
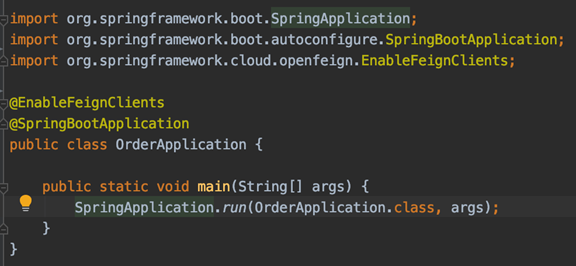
We need to enable the usage of Feign Client through an annotation in the OrderApplication class:
OrderApplication.java
With this, we have the Order application ready to be deployed.
Application Deployment
Similar to the steps followed in Inventory Service, create a Spring Cloud app in Azure, set the public domain and deploy the generated jar for Order Service:
```
az spring-cloud app create -n <name_of_app> -s <name_of_azure_spring_cloud> -g <resource_group_name>
```
Once the app is created, assign a public domain:
```
az spring-cloud app update -n <name_of_app> -s <name_of_azure_spring_cloud> -g <resource_group_name> --is-public true
```
```
az spring-cloud app deploy -n <name_of_app> -s <name_of_azure_spring_cloud> -g <resource_group_name> --jar-path <path_to_generated_jar>
```
Once the app starts, test it using cURL or Postman. A sample input is given below:

Conclusion
By now, we have seen how Azure Spring Cloud makes it easy for developers to start utilizing the Spring Cloud features such as Spring Cloud Service Discovery, Spring Cloud Config Server and auto configuration of environment variables with minimal or no coding/configuration. This will definitely help developers to be more productive and less worried about the underlying infrastructure.